
Windows: piilota tiedostot ja kansiot
Monen käyttäjän järjestelmissä, kuten Windows, voi olla tarpeen piilottaa kansioita ja tiedostoja estääksesi muita käyttäjiä pääsemästä niihin.
Piilota tiedostot ja kansiot nopeasti
Yksinkertaisin ratkaisu on asettaa niin kutsuttu piilotettu ominaisuus.
- Voit tehdä tämän napsauttamalla hiiren kakkospainikkeella tiedostoa tai kansiota ja siirtymällä "Ominaisuudet".
- Valitse "Piilotettu" vieressä oleva valintaruutu ja vahvista "Käytä".
Piilota tiedostot ja kansiot turvallisesti tietyiltä käyttäjiltä
Valitettavasti kuka tahansa käyttäjä voi helposti ohittaa yllä mainitun toimenpiteen, koska tiedostontutkija tarjoaa mahdollisuuden näyttää piilotettuja tiedostoja tai kansioita. Seuraavilla ohjeilla voit säännellä pääsyä paljon tehokkaammin. Näin se toimii:
- Siirrä vain piilotettavat tiedostot ja kansiot kollektiiviseen kansioon, jonka pääsyä voit säädellä.
- Napsauta nyt hiiren kakkospainikkeella kansiota ja valitse "Ominaisuudet" -vaihtoehto pikavalikosta.
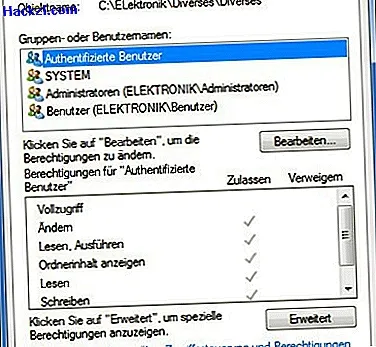
- "Suojaus" -välilehdessä näet käyttäjäryhmät kohdassa "Ryhmä- ja käyttäjänimet". Jos napsautat tiettyä, näet alla olevat ruudut, mitkä käyttäjän oikeudet ovat.
- Voit nyt joko luoda uuden käyttäjän, jonka oikeuksia haluat rajoittaa tai peruuttaa olemassa olevan.
Lisää käyttäjiä, joiden pääsyä haluat rajoittaa
Jos haluat määrittää uuden käyttäjän, toimi ensin seuraavasti:
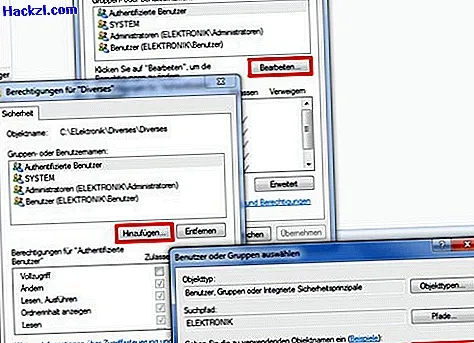
- Napsauta nyt [Muokkaa] -painiketta ja sitten [Lisää] -painiketta.
- Kirjoita "Valitse käyttäjät tai ryhmät" -ikkunaan käyttäjän nimi, esim. "Sven", napsauta sitten [Tarkista nimi] -painiketta ja sitten [OK] -painiketta.
Kumoa käyttäjien oikeudet kansioihin ja tiedostoihin
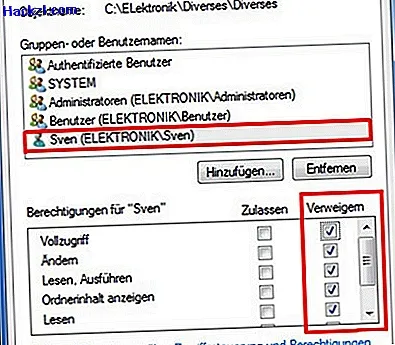
- Käyttäjä "Sven" on nyt luettelossa, jonka tunnet jo kohdasta 1. Merkitse nyt käyttäjä "Sven" napsauttamalla hänen nimimerkintää.
- Alemmassa ikkunassa "Sven" -valtuudet "näet nyt nykyiset valtuutusasetukset. Poista kaikki hakemiston käyttöoikeudet Svenistä napsauttamalla "Täydellinen käyttö" -valintaruutua "Estä" -sarakkeessa ja ottamalla sitten asetukset käyttöön napsauttamalla [Käytä] -painiketta.
- Voit peruuttaa muiden käyttäjien pääsyn napsauttamalla [Lisää] -painiketta uudelleen ja aloittamalla uudelleen vaiheesta 2.
- Napsauta [OK] -painiketta, jos et halua lisätä uusia käyttäjiä tai ryhmiä luetteloon.
Huomaa, että Windows-käyttöoikeuksien myöntäminen on paljon monimutkaisempaa kuin tässä pienessä esimerkissä esitetään. Kuka tahansa järjestelmänvalvojan oikeudet omaava käyttäjä voi kumota yllä mainitut asetukset - tämä koskee kuitenkin kaikkia asetuksia. Esimerkiksi, jos haluat asettaa rajoittavan oikeuksien siirron pienyritysverkostoon, on tärkeää käsitellä tätä aihetta intensiivisemmin.
Lue täältä, kuinka suojata kansio salasanalla Windows 7: ssä.