
Savuvaikutus gimpillä - miten se toimii
Gimpissä voit luoda vaikuttavia savutehosteita ja antaa sen höyryyttää ja savua valokuvissasi. Ohjeet ja kuvagalleria löytyvät täältä.
Gimp: Luo savutehosteita IWarp-suodattimella
- Avaa Gimp ja käytä "Tiedosto" luodaksesi uuden asiakirjan, joka on suunnilleen savupylvään kokoinen - hieman yli kaksinkertainen. Täytä sitten tausta valkoisella maalilla. Tällä tavoin savu tunnistetaan paremmin myöhemmin, kun työskentelet sen kanssa.
- Lisää nyt uusi taso kerrosvalikkoon "New Layer ..." -valinnalla, valitse "Kalvo" tason täyttötyypiksi valintaikkunassa ja napsauta "OK".
- Aseta tummanharmaa etualan väri ja piirrä paksu pystysuora viiva harjatyökalulla. Käytä sitten vaaleampaa harmaasävyä ja pienempää harjasädettä toisen tahdin piirtämiseksi (suunnilleen ensimmäisen keskellä). Ei ole tärkeää, että työskentelet erittäin tarkasti, iskut voivat helposti vinostua ja vinossa.
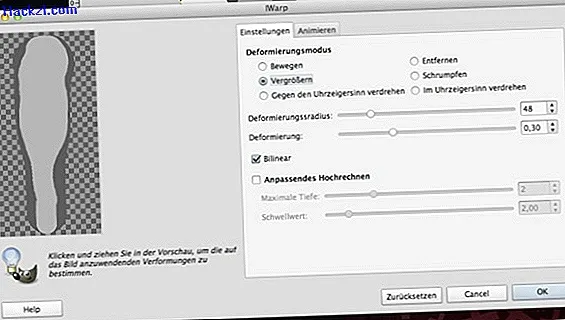
- Avaa nyt "IWarp" -suodatin, joka löytyy "Suodattimet" -valikosta "Vääristösuodattimet" -kohdasta. Valitse "Suurenna" muodonmuutostila ja muodonmuutossäde noin 30 - 60.
- Siirry nyt esikatseluikkunassa hiiren painikkeella painettuna tahdin keskeltä yläreunaan. Toista prosessi tarvittaessa yksi tai kaksi kertaa, kunnes linjasi on ylemmässä puoliskassa paljon paksumpi kuin alaosassa.
- Vaihda nyt muodonmuutostila "kutistua" ja siirry esikatseluikkunaan hiiren painikkeella painettuna tahdin keskeltä. Kun olet tyytyväinen tulokseen, napsauta "OK".
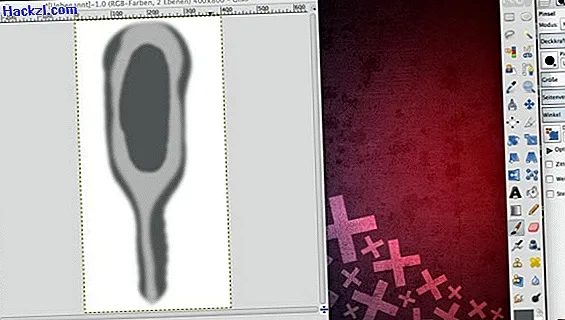
- Käytä Gaussin sumennusta kuvan hämärtämiseen noin 10 - 20 pikselin säteellä. Löydät "Gaussian blur" "Suodata" -valikosta "Blur" -kohdasta.
- Valitse sitten silmäsiirrin avulla tummempi harmaan sävy kuvastasi etualan väriksi ja piirrä soikea harjan yläpuolelle soikea. Jälleen ei ole tärkeää, että työskentelet erityisen tarkasti.
- Napsauta "Suodatin" -valikossa "Toista Gaussian sumennus" pehmentääksesi kuvaa uudelleen aiemmin asetetuilla arvoilla.
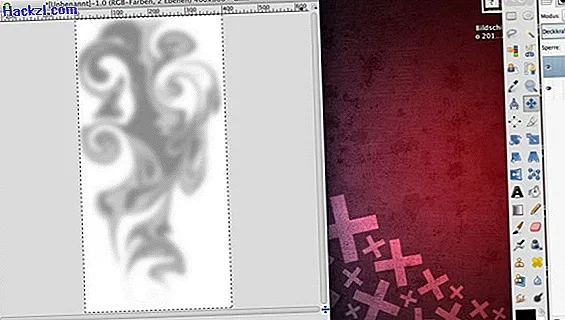
- Avaa "IWarp" -suodatin uudelleen, mutta valitse tällä kertaa muodonmuutostilaksi "Kierrä vastapäivään". Pidä esikatseluikkunassa hiiren painiketta alhaalla ja siirrä iskua ylös ja alas muutama kerta, kunnes pyörteet muistuttavat savupilviä. Napsauta sitten "OK".
- Levitä Gaussin hämärtäminen uudelleen asettamalla säde 20 - 30 pikseliä.
- Nyt voit kopioida kerroksen, jolla savu sijaitsee, ja liittää se toiseen kuvaan. Koko asia näyttää entistä realistisemmalta, jos vähentää kerroksen opasiteettia savun kanssa hieman uudessa asiakirjassa. Voit lukea yksittäiset vaiheet kuvagalleriamme.

Opi luomaan hehkuva tähtitaivas Gimpillä tällä käytännöllisellä kärjellä.
Uusimmat videot
Luo läpinäkyvä kerros valkoista taustaa vasten.

Piirrä kaksi pystysuoraa viiraa, joiden paksuus on erilainen, käyttämällä harmaasävyjä.

Käytä IWarp-suodatinta muodonmuutostilassa "suurenna" ja "pienennä" määritelläksesi savupilven karkeat ääriviivat.
Muokkaa välitulosta Gaussin hämärtämällä.

Piirrä tummanharmaa soikea sovituksen päälle ja lisää Gaussin sumennus uudelleen.
Aseta pyörteet IWarp-suodattimella muodonmuutostilaan "vastapäivään kiertyminen".

Lopuksi, pehmentä savua uudelleen.
Jos haluat liittää savupilven toiseen kuvaan, pienennä hiukan savun sisältävän kerroksen opasiteettia.
