
Photoshop: miten luoda liekkejä
Osoitamme sinulle yksityiskohtaisesti, kuinka liekit luodaan Photoshopilla tässä käyttöoppaassa.
Luo liekit Photoshopissa: Näin
- Avaa Photoshopissa kuva, jonka haluat herättää liekillä.
- Kopioi ensin kerros ja aktivoi yläkerros. Avaa valotehosteiden valintaikkuna valikon "Suodatin" ja "Suodatin suodattaa" -kohdan kautta. Siirrä ympyrä esikatseluikkunassa ympyrä siten, että keskusta on tahton yläpuolella.
- Valitse "Spot" valotyypiksi ja väriksi kirkkaan oranssi. Aseta voimakkuuden liukusäädin asentoon 25 ja tarkennusliukusäädin arvoon -100. Ominaisuuksiin voit käyttää keskipitkää ruskeaa. Jätä kiilto ja valotus arvoon 0, vedä materiaali arvoon 70 ja ympäristön arvoon 10. Leiki asetuksilla, kunnes olet tyytyväinen tulokseen.
- Nyt tarvitset uutta tasoa. Aseta etualan väri vaaleankeltaiseksi. Piirrä ellipsi tahton ympärille ellipsinvalintatyökalulla. Täytä nyt valinta gradientilla vaaleankeltaisesta läpinäkyvään. Poista alueet, joita et halua korostaa, käyttämällä pehmeää pyyhekumia. Vaihda kerroksen tilaksi "Moninkertaisesti negatiivinen".
Photoshop: luo liekkejä
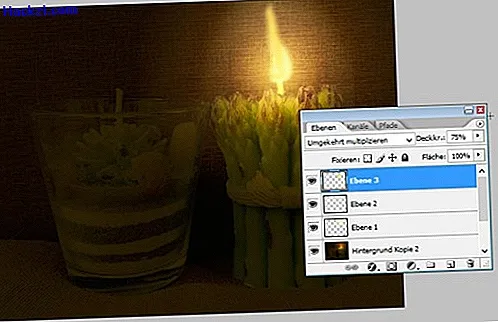
Tulipalo on nyt valmis, mutta liekki on vielä sytytettävä.
- Maalaa vaaleankeltainen liekki uudelle kerrokselle harjatyökalulla. Hieman oranssi ja punainen sävy tekevät liekistä realistisen.
- Liekin välkkyminen luodaan "Motion blur" -suodattimen kohdalla "Blur filter".
- Palotyypillinen säteily puuttuu edelleen. Voit luoda tämän luomalla uuden kerroksen ja vetämällä säteittäisen kaltevuuden oranssista etualan väreistä läpinäkyvyyteen kanan yli.
- Vaihda kerrostila "normaalista" tilaan "negatiivinen kertolasku" ja pienennä opasiteettia hieman.
- Toista vaiheet kolme ja neljä, valitse vain tällä kertaa etualan väreksi valkoinen. Sinun olisi nyt pitänyt luoda realistinen liekki lämpimällä hehkulla.
Uusimmat videot
Valotehosteiden avulla saat ensimmäisen tulipalon.

Liekki näyttää silti hieman tummalta ja puuttuu vaaleudesta.
Radiaalisella tasoitustyökalulla saat viimeistelyn.
