
Blender: Tarjota esineitä ja animaatioita - miten se toimii
Jos olet luonut kauniin mallin tai animaation Blenderissä, se on silti renderoitava. Renderöinti on kuvan tai elokuvan laskemisen malli.
Renderoi esine Blenderillä - oikeat valoasetukset
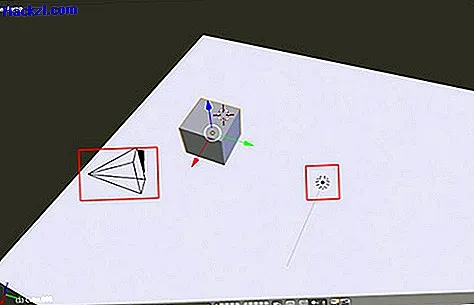
Ennen kuin voit rentoutua kohtauksen tai objektin Blenderissä, sinun on asetettava ja säädettävä sopivat valonlähteet. Blenderissä on 5 erityyppistä valoa, joista jokaisella on erilaiset tehosteet kohtauksessa ja jotka tarjoavat erilaisia vaihtoehtoja. Voit lisätä uuden valonlähteen komennoilla [Shift] + [A] "ja" Lamppu ". Sitten voit kiertää, skaalata tai sijoittaa niitä tavalliseen tapaan. Normaalissa kohtauksessa valoja ei näytetä, joiden vaikutukset voit nähdä vain Löydät myös yksittäiset valotyypit kuvagalleriasta:
- Kohtavalo: Kohtavalo valaisee valon ympäristön vakioisella säteellä, samanlainen kuin hehkulamppu. Blenderin oikealla puolella olevilla valoasetuksilla voit asettaa valon värin, säteen (etäisyyden) ja valon kirkkauden.
- Auringonvalo: Aurinko toimii kuin luonnollinen auringonvalo: se sijoitetaan koko kohtauksen päälle ja valaisee kaikki esineet samalla kirkkaudella. Kohteen kierto muuttaa kohtauskohteiden valaistuja puolia. Voit käyttää aurinkovaloa erittäin hyvin rakentaaksesi pelin yleisen kirkkauden.
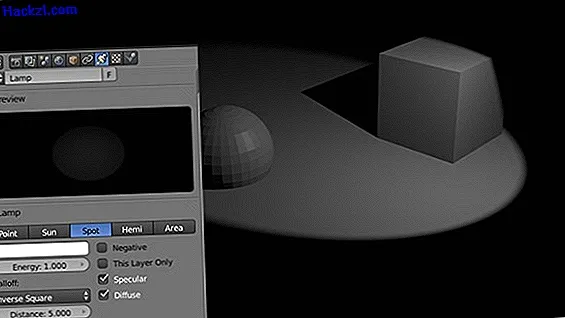
- Kohdevalo: Kohdevaloa voidaan verrata erittäin hyvin taskulamppuun. Se lähettää valonsäteen yhteen suuntaan, joka heikkenee suuremmalla etäisyydellä. Kohdevalolla voit määrittää kohdevalon reunan muodon ja kulman värin, lujuuden ja aluealueen lisäksi "Spot-Shape" -asetuksissa.
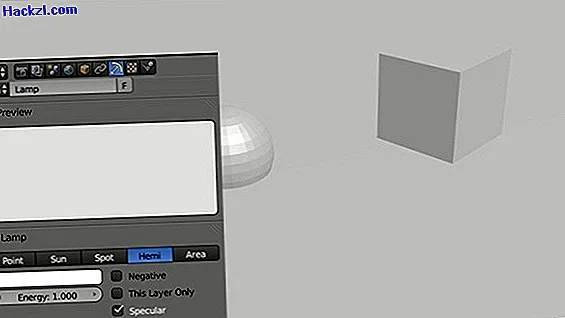
- Hemi-Light: Tämä valonlähde toimii samalla tavalla kuin aurinko - mutta luo peliin vieläkin voimakkaamman kirkkauden. Esimerkiksi valolta kaukana olevilla puolilla on silti voimakas kirkkaus ja esineet eivät voi varjoa. Jos haluat tehdä yksittäisiä malleja Blenderissä, Hemi-Light on ihanteellinen.
- Aluevalo: Samoin kuin pistevalo, aluevalo paistaa tietyssä sädessä valonlähteen ympärillä. Suurin valo on kuitenkin jakautunut suuremmalle alueelle, eikä se ole keskittynyt yhteen pisteeseen. Voit muuttaa tätä tasaisen valon leviämistä gamma-arvossa asetuksissa.
Säädä kameran asetuksia Blenderissä
Jotta Blender voi laskea kuvan olemassa olevista malleista, kameran on oltava käytettävissä kohtauksessa. Tätä voidaan verrata erittäin hyvin normaaliin kameraan: Kaikki kameran katselukulmassa olevat esineet näkyvät myöhemmässä renderöintikuvassa. Jos animoit kameraa Blenderissä, kuvaat esimerkiksi tyylikäitä kameran kuvia yksittäisten kohtausmalleiden kautta. Jos kohtaus ei vielä sisällä kameraa (tämä luodaan automaattisesti uutta asiakirjaa varten), voit lisätä uuden kameran komennoilla [Shift] + [A] "ja" Kamera ".
- Jos olet valinnut kameran hiiren oikealla painikkeella ja painanut numeroa [0] numeronäppäimellä, kohtausnäkymä muuttuu kameran perspektiiviin. Voit nähdä myöhemmän kuvan mitat katkoviivalla. Liikuta ja kierrä kameraa, kunnes pidät leikkauksesta.
- Kamera-asetuksissa (pieni kamerakuvake Ominaisuudet-ikkunassa) voit asettaa vähimmäis- ja enimmäisetäisyyden kohdassa "Leikkaus". Voit määrittää näkyvän alueen koon myös Focal Length -kohteella - liian pienet arvot voivat kuitenkin aiheuttaa vakavia vääristymiä.
- Maapallolla olevan pienen symbolin avulla pääset suoraan kameraan kytkettyihin maailmanasetuksiin. Täällä voit asettaa renderoinnin taustan värin tai aktivoida sumun. Kohde "Ambient Occlusion" on erityisen käytännöllinen - tämä vaikutus luo luonnollisen ympäröivän varjon, joka parantaa graafisesti kohtausta.

Levitä kuvia ja elokuvia
Jos olet valmistellut kohtauksen oikein, voit viedä kuvan tai elokuvan kameralla. Saat yksinkertaisen esikatselukuvan painamalla [F12] -näppäintä - kuva rakennetaan sitten askel askeleelta. Painikkeella [Esc] palaat 3D-näkymään. Valitse kuvake pienellä kameralla "Asetukset" -kohdassa. Voit muuttaa renderöintiasetuksia seuraavasti:
- "Resoluutiolla" voit asettaa renderöimätyn kuvan tai elokuvan kuvasuhteen ja resoluution. Tämän alapuolella on prosenttipalkki: Kun asetettu resoluutio on 1280 x 720 ja 50 prosenttia, kuvasi lasketaan kooltaan 640 x 360. Voit esimerkiksi testata pieniä muutoksia alhaisella tarkkuudella.
- Tarkkuuden lisäksi voit muuttaa animaation vientiä koskevia asetuksia: Tässä määritetään esimerkiksi elokuvan aloitus- ja loppukehys sekä elokuvan kuvanopeus.
- Määrität alla olevan "Tulostus" -alueen kuvan / elokuvan määränpään ja tiedostomuodon. Sitten voit laskea kuvan napsauttamalla "Animaatio" -painiketta käyttämällä "Render" -animaatiota.
- Huomaa: Kuva renderoidaan vain kerran, mutta animaation on laskettava jokainen kehys. Siksi tämä prosessi voi viedä kauan.
Kuvagalleria: Yleiskuva valonlähteistä
Blenderin käytännössä käytetty versio on 2, 69.
Uusimmat videot
Kohdevalo säteilee hyvin pienellä säteellä.

Auringonvalo valaisee kohtauksen tasaisesti kaikissa paikoissa, mutta valosta poispäin suuntautuvien esineiden sivut pysyvät pimeinä.

Kohdevalo paistaa - kuten taskulamppu - vain yhteen suuntaan.
Hemi-Light valaisee kohtauksen tasaisesti, kuten auringonvalo, mutta ilman varjoja ja vastakkaisten puolien tummenemista.
Aluevalo paistaa kuin pistevalo tietyllä säteellä - valo kuitenkin jakautuu suuremmalle alueelle eikä keskittyy pisteeseen.
